How to Draft a Bodice Pattern Piece
Making clothes for yourself is a lot of fun, and in my experience, making clothes without using a commercial pattern is even more fun!
If you don’t use a pattern (or more to the point, draft the pattern pieces yourself), not only will you end up with something designed specifically for your body shape, you’re not restricted to what patterns are available. The only limit is your imagination!
When I started making clothes for myself without using a pattern, I started off by draping fabric over a dress form and drawing on where I needed to cut with a pen. I quickly discovered that my dress form and I are not the same size!
So instead I pinned the fabric to myself and did it that way. However this is rather tricky to do without a reliable helper.
The things I made did fit well enough to wear them, and most of them I still wear now. I’ve since discovered that having at least a rough idea of a pattern shape makes everything much easier.
In this post I’m going to show how to make a basic bodice pattern piece (also known as a block or a sloper).
I’ve not had any professional training in sewing or dressmaking at all. My mum taught me how to use a sewing machine when I was 10 and the rest I have learnt along the way.
So the method described below isn’t necessarily the proper way of doing things! I like things to be simple and uncomplicated, and sometimes the proper way is very complicated! This method for drafting a bodice pattern piece is the one that I use.
To start with, you’ll need to measure yourself. You might like to read these tips for taking measurements.
Don’t forget to add a seam allowance and a couple of cm for ease of wearing to your finished bodice!
Once you have your bodice pattern piece drafted, it’s best to make a toile (also known as a muslin). A toile is a trial version that allows you to check that it fits and to make any necesssary alterations before making something for real. £3 a metre polycotton is very good for this (affiliate link)!
You Will Need
Before you start, there are some tools you will need. If you’ve been sewing for a while, you’ll probably have at least most of it. If not, I’ve included some Amazon affiliate links below.
For measuring yourself, you need a plastic tape measure.
For drafting the pattern, you will need some large sheets of paper. Pattern paper is great. Some of it comes with squares or dots printed on it
, which is helpful. Swedish pattern paper
has the advantage that you can sew it. An old sheet makes a good alternative.
A long ruler is also a necessity. A tiny 6 inch ruler won’t be long enough!
A nice sharp pencil and an eraser for drawing.
A French curve is a “nice to have” for drawing armholes and necklines.
Drafting the Bodice Pattern Piece
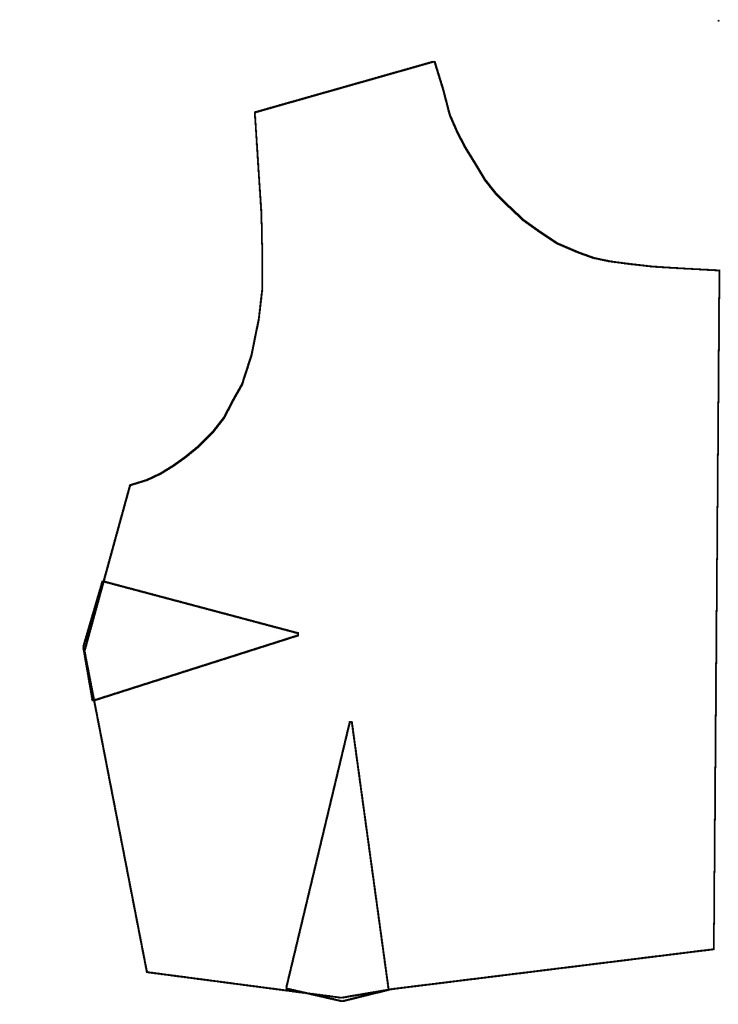
A bodice front usually has darts at the side and often at the bottom as well.
Darts might seem intimidating if you have not come across them very much, but they’re nothing to worry about! They are just triangular shaped tucks that give the bodice some shape and allow for the fact that women’s bodies are not cuboid.
There’s a tutorial showing how to sew darts here.
To draft a bodice front, start off with a large rectangle.
Draw a vertical line the same length as the distance from the top of your shoulder near your neck to your waist. This will be the centre line of the bodice. When you cut out your fabric, it will be this line that goes on the fold.
Near the top of the line, draw another line at right angles to it the same length as half the distance across your collarbone.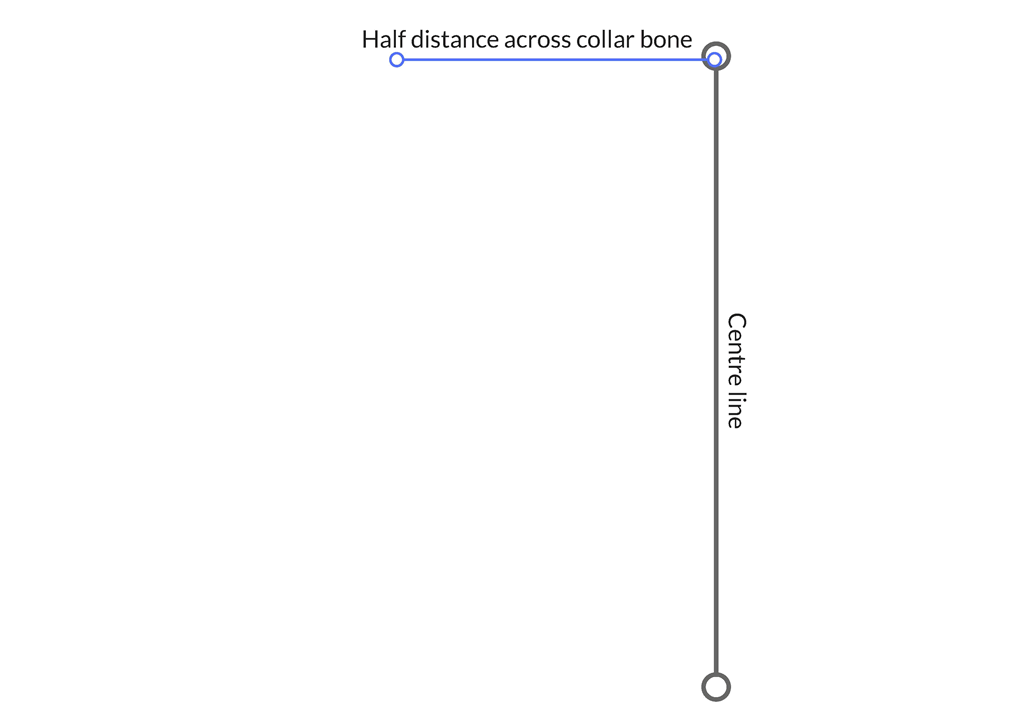 A couple of cm below and using the measurement across your shoulders divided by 2, draw another line below the first horizontal line.
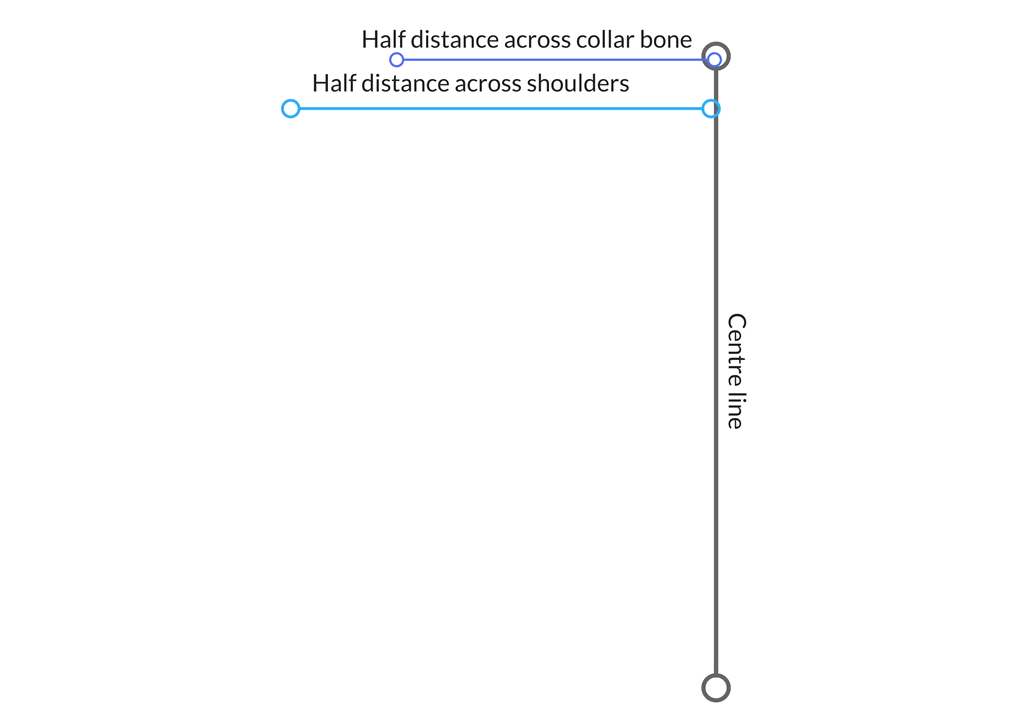 For the next horizontal line, you will need your chest measurement divided by 4 and your shoulder to just past your armpit measurement.
On your pattern, find the outside edge of your shoulder line. Measure down the same distance as from your shoulder to just past your armpit.
At the bottom of that line, draw a horizontal line the same length as your chest measurement divided by 4. Underneath your chest line, draw another line, this time your bust measurement divided by 4.
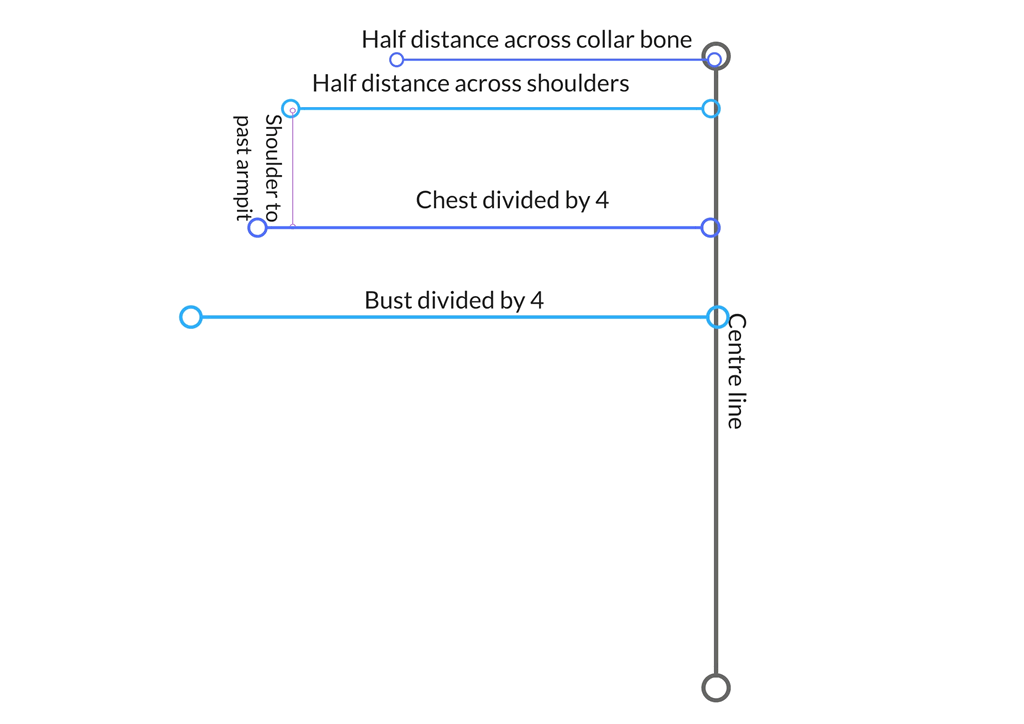 How far down you draw this line is will depend on the distance between where you took your chest measurement and where you took your bust measurement.
From the bottom end of the first vertical line, draw a horizontal line the same length as a quarter of your waist measurement.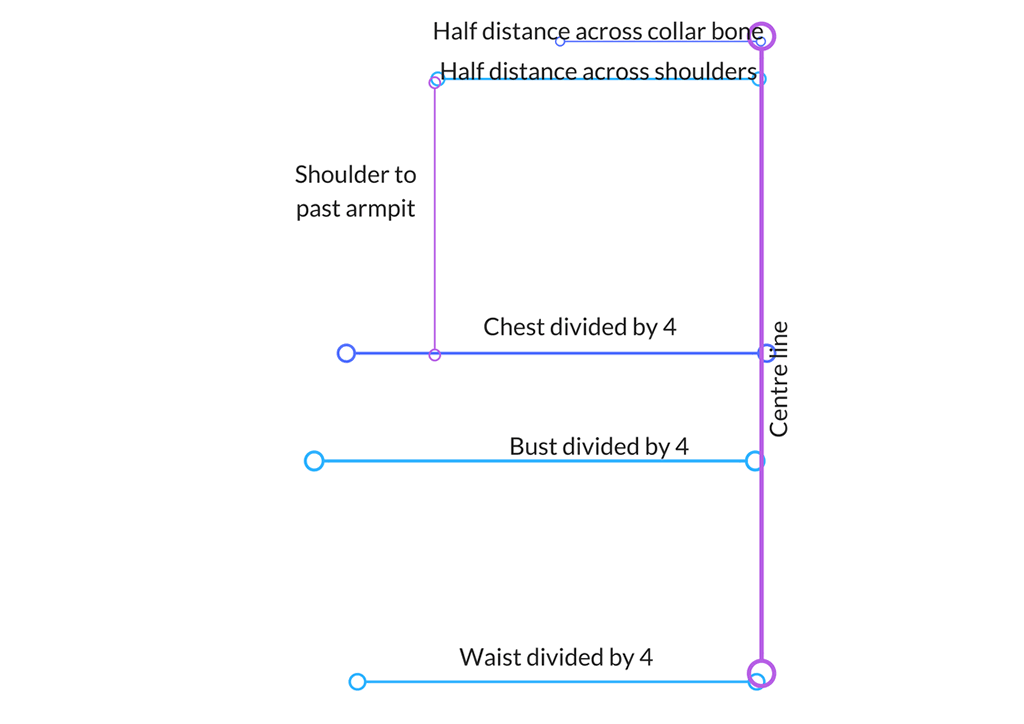 Now join the lines up! To get the curve of the armhole, you might like to use a French curve.
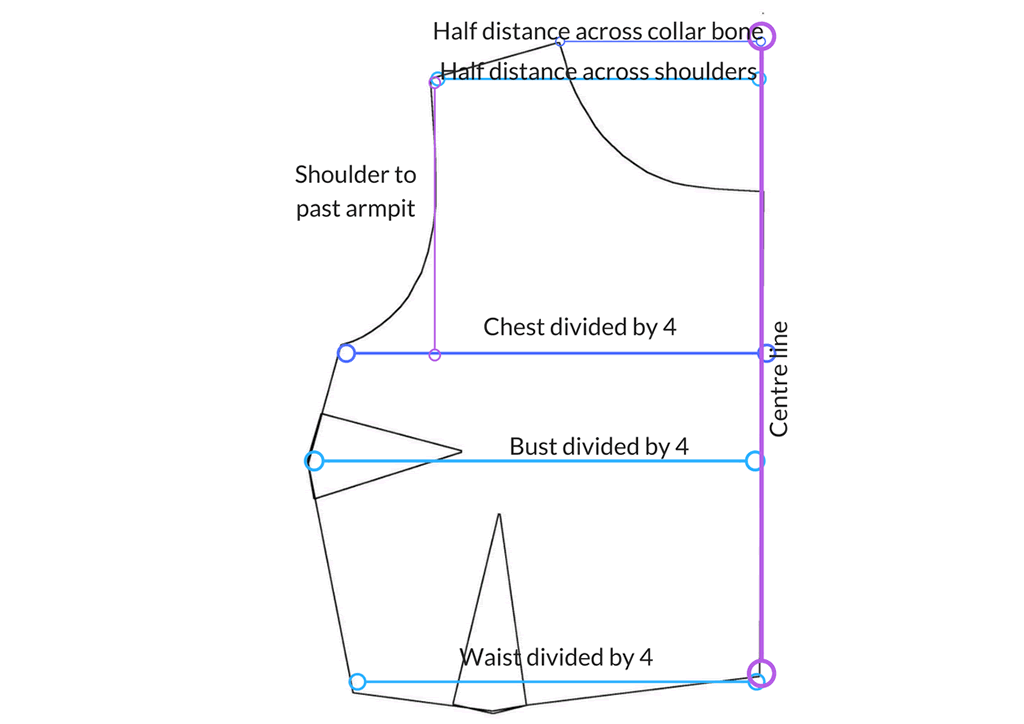
To draw the neckline, measure down from the top of the centre line about 8 cm. Using a French curve, join to the far end of the collarbone line.
Now pin your bodice pattern piece to your dress form (or to yourself if you prefer). Check that the neckline is where you want it and redraw it if necessary.
Adding the Darts
To draw the side darts, find the bust line and mark a couple of cm either side. Join these marks to a point about 8 cm along the bust line. You will need to check this on yourself or your dress form to determine whether it is correct. If it’s not right, adjust it. You might need to make it wider or narrower, shorter or longer, or adjust the position a little bit.
If you want to add darts at the bottom of the bodice, these will need to go 8 – 10 cm out from the centre. They will be longer and narrower than the side darts. Again, check on yourself to make sure they’re accurate.
Bodice Back
The official way to draft a bodice back is to take the same measurements from your back, then using these draft the pattern piece in the same way that you did the front.
If you don’t fancy doing things the official way, there is an easier and quicker way! You can use the bodice front as a guide. Simply draw round the bodice front, then adjust the neckline so that it is shallower. Just be aware that it might need some adjusting when you make your toile.
Using Your Bodice Pattern Piece
To turn your bodice pattern piece into a top, just make it a bit longer and a bit wider, unless you want it to be close fitting. Depending on how long you want it to be, you might have to allow for your hips too.
You’ll need to consider how you’re going to get in and out of it. On dresses I prefer an invisible zip sewn into the side seam. Alternatively you could add buttons or a zip to the front or the back. Just use your bodice front pattern piece to cut 2 halves and allow extra for a zip seam or button bands.
The neckline on your bodice pattern piece can be changed. Use it as a starting point, then change the neckline to a v neck, a sweetheart neckline or whatever you prefer.
If you’re looking for an easy way to make your bodice into a dress, you could add a circle skirt. This is what I did here with my cherry blossom dress!
Happy sewing!


Thanks for your pattern drafting lesson. Very helpful but I keep wondering how you make up the length of the back after the amount taken in as side bust dart.
Hi, I need to revise this post as I’ve found the same thing when using my own instructions! What I would do is add gthe amount taken in in the dart to the bottom. Then when the darts are sewn, measure straight across the bottom of the bodice and cut off any fabric that’s below where you’ve measured. Hope that makes sense!
Thank you so much for this. Now I get it!
Brilliant!
You are truly a blessing finally someone who breaks it down I’ve watched tons of videos and still couldn’t catch on thanks a bunch
Bless you Jackie, thanks, this is why I do this 🙂