How to Make an Advent Calendar
People round here start Christmas early. There are people in my village who get all their lights up as soon as Bonfire Night is over. As today is Bonfire Night, I expect to see some Christmas lights appearing over the next week or so!
It might seem early, but it will soon be upon us!
So for those of you who like to enjoy Advent with your children, or on your own, here is a tutorial for how to make an Advent Calendar with pockets.
How to Make an Advent Calendar
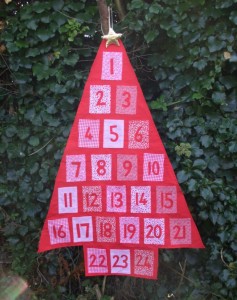
1. From cotton or polycotton fabric, cut 24 rectangles measuring 11 cm x 14 cm.
2. Arrange them either on a table or on the floor. You’ll need some room! Once you have arranged them, you might like to take a photo to help remember how you have arranged them.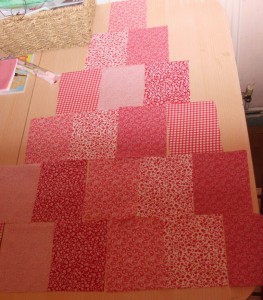
3. Lay a piece of greaseproof paper over the top of the rectangles. On the greaseproof paper, draw a triangle with a rectangle at the bottom, ensuring that it covers the rectangles. This will be your tree template.
4. EITHER fold in all 4 edges of each rectangle, pin and press, OR cut 24 bits of fusible interfacing 11 cm x 14 cm and iron onto the back of each rectangle. Hem the top edge of each rectangle.
5. Using either cotton or polycotton backed with interfacing, or felt, cut the numbers for the pockets. If you are not confident drawing the numbers straigt onto the fabric, you could print some numbers out in a large font to use as a template. Applique the numbers to the pockets so that they number from 1 to 24. If you don’t fancy all that sewing, you could glue them on with fabric glue.
6. To make the tree, cut a piece of interfacing using the paper template made earlier and a slightly larger version out of cotton or polycotton. Iron on the interfacing, then hem the raw edges of the tree.
7. Pin the pockets to the tree, then sew along the two sides and the bottom of each pocket.
8. Depending on what you are planning to put in the pockets, you might wish to add a piece of dowel to the bottom of the tree. To do this, add some little pockets to the back of the bottom corners of the tree and tuck the ends of the dowel inside.
What you add to the pockets is up to you! It bothers me a little that Christmas seems to be about stuff, so I have divided the Christmas story (ie the one in the Bible!) into 24, and written each little section onto a label. The labels are numbered so I don’t get into a muddle! The labels go into the pockets, along with 4 sweets (1 for each of my boys!) and a Christmas decoration.
The boys have their own tree, so each night before bed, they take the stuff out of the appropriate pocket, read out the label and hang it on their tree along with the decoration. Then they eat the sweeties. Then they clean their teeth!
Other possibilities for the pockets would be a little toy, or The Night Before Christmas divided up into 24, or a do it yourself lego advent calender or a craft activity for each day.
If you use an Advent calendar with pockets, what do you put in them?


One Comment