How to Draft a Trouser Pattern
One of the things I love about sewing for little ones is that they don’t care about what other people think!
My youngest boy, Cosmo, is 4. He doesn’t think in terms of some things being for boys and other things being for girls, he just thinks about whether he likes them. His favourite colour is pink.
With Cosmo starting school in September, I know that these days of him being free to be just who he is in the way that only small children are are coming to an end, and try as I might to keep him this way, he will be dictated to a bit by other kids at school.
So when I had to go into King’s Lynn to rescue a pair of shoes that got left on the bus, I jumped at the chance to take my little lamb to the fabric shop and let him chose something that I could make into a pair of trousers.
Cosmo chose some fabric with the bees on, which I think will make a lovely pair of trousers for the rest of the summer!
I didn’t have a pattern and last time I made trousers, I drew round a pair of trackie bottoms. This worked out ok, but they were a bit baggy around the top.
So this time, I decided to draft a trouser pattern properly so my little boy will have a pair of gorgeous bumble bee trousers that fit his sweet little self perfectly!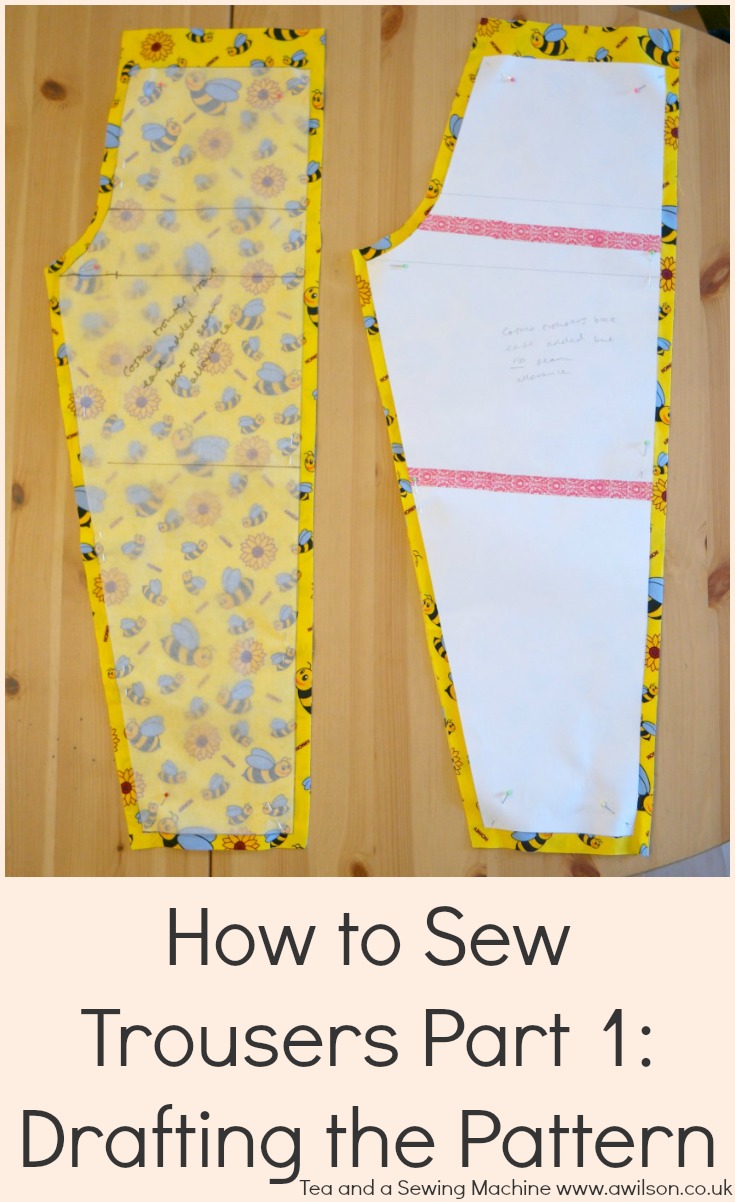
How to Draft a Pair of Trousers
It’s easier than you might think to draft a trouser pattern! Although this was a pair for a little boy, the same principles apply whatever the size of the person.
You Will Need
Pattern paper or greaseproof paper, a pencil, a ruler and a tape measure. A French curve
is useful but you could use a plate instead if you don’t have one. These are affiliate links.
Taking Measurements
The key to sewing clothes that fit properly is taking accurate measurements.
To draft a trouser pattern, you will need to measure:
Waist to ankle (the easiest way to do this is to dangle the tape measure upside down)
Waist to knee
Waist to hips (at the widest point)
Rise (sit on a chair, then measure from your waist to where your butt meets the chair)
Around your waist
Around the front of your hips at the widest point
Around the back of your hips
Around your knee
You’ll also need to decide how wide you want the trousers to be at the bottom.
Drafting the Pattern
The pattern will be drafted in 2 sections. There’ll be one section for the back, and one for the front. These sections will then be cut on doubled fabric, so you’ll have 2 back pieces and 2 front pieces.
Trouser Front
1. Take your pattern paper and down one edge, draw a vertical line the same length as the distance from your waist to your ankle. If you are making trousers for yourself, you might need to stick pieces of paper together.
2. On that vertical line, mark on your waist (that’s at the top), distance from waist to hips, your rise, and waist to knee.
3. Now you’re going to draw on the horizontal lines. These will go where you marked on the vertical line.
Take your waist measurement and divide it by 4. Add 1 cm for ease and draw that line at the top of the vertical line.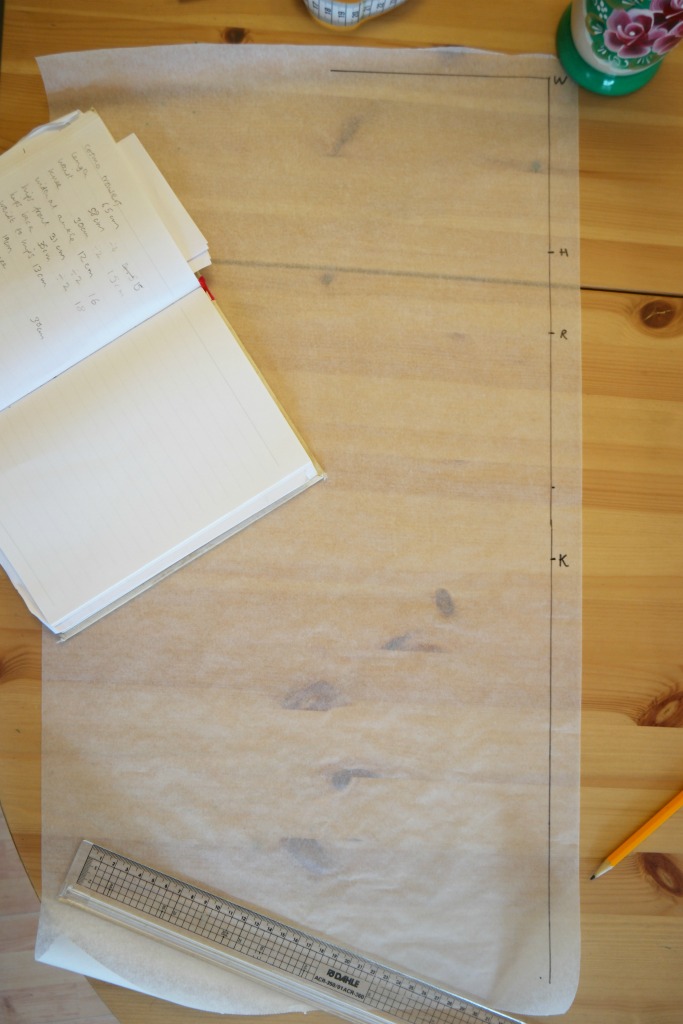
4. Take your front hip measurement and divide it by 2. Add 1 cm, then draw that horizontal line where you marked your hips.
5. Underneath that, where you marked your rise, draw another horizontal line the same length as your front hip measurement. 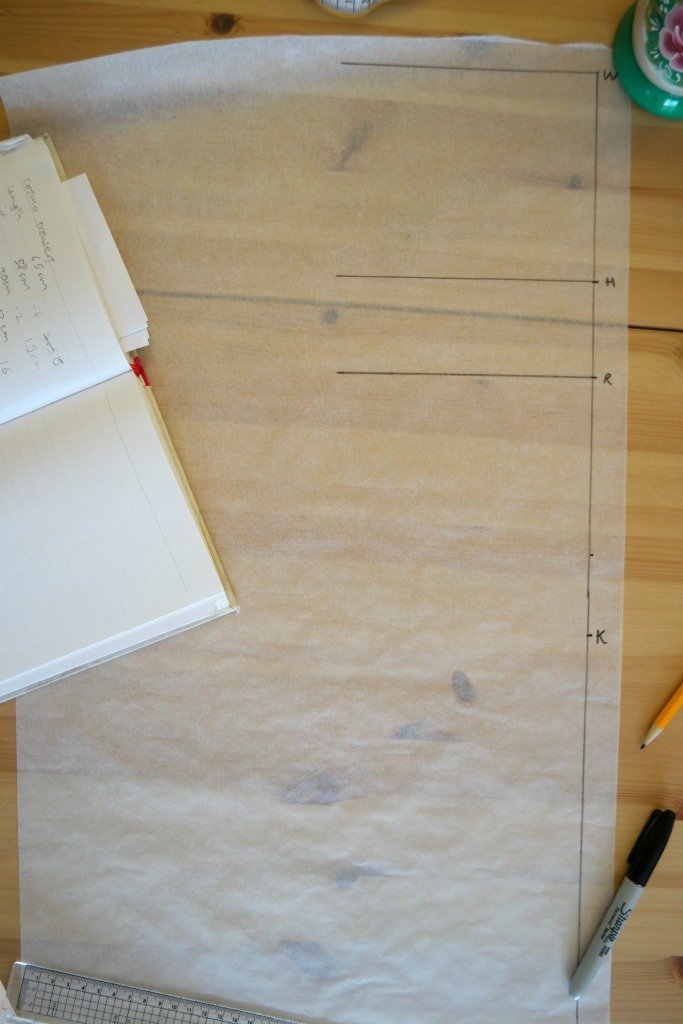 This line will need to be longer, so we have to calculate the crotch extension (I wish they’d call it something else!). How long was the line you just drew? Multiply that by 0.25, then extend the rise line by that amount.
6. Now find where you marked your waist to knee measurement on the vertical line. Divide your knee measurement in half, and 1 cm for ease and draw it on.
7. At the bottom of the line, draw a last horizontal line. This will be the width you want the trousers to be at the bottom.
8. Now join the lines up! The waist to hip line will be straight. The next part, the hip to rise, will need to be curved. For this you can use a French curve, or a plate will do if you don’t have one.
 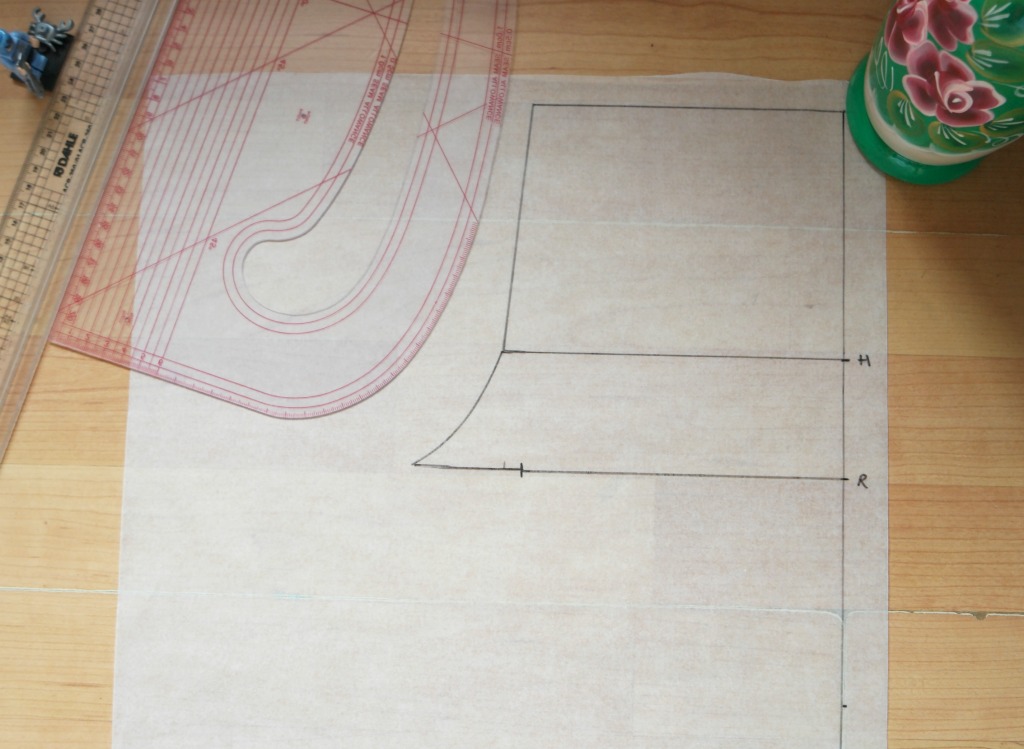 The rise to ankle will also be a straight line.
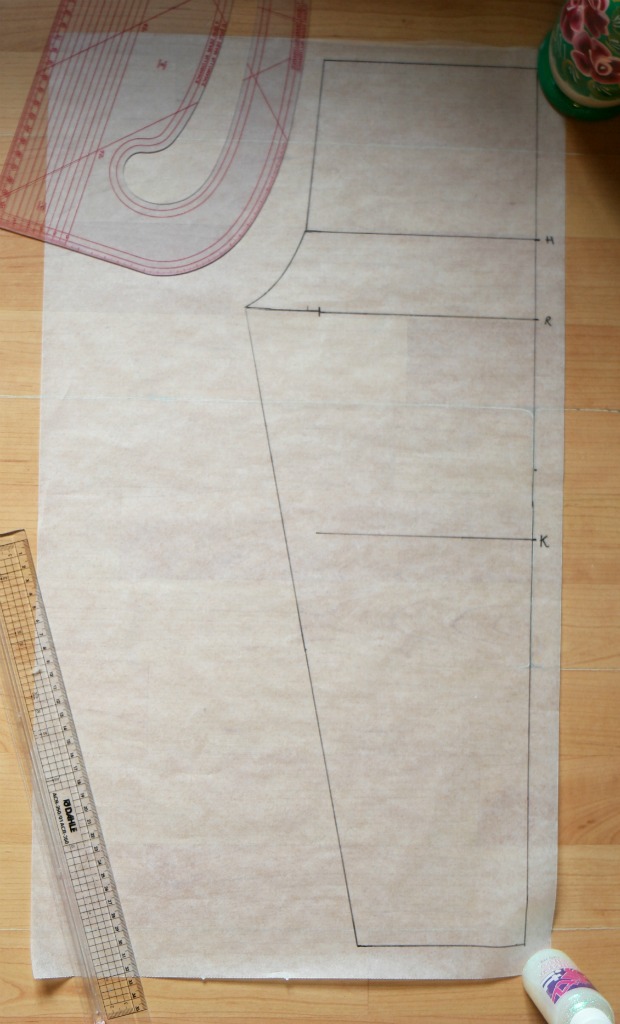
Don’t worry about joining it to the knee line. Just make sure that you don’t go through that line, or you’ll have issues getting your trousers on!
Drafting the Trouser Back
Drafting the back section is done in exactly the same way as the front, with 2 exceptions.
The first is that where you draw you hip line, you will need to use the measurement you took around the back of your hips, divided by 2, plus 1 cm for ease of wearing.
The other exception is that to work out the crotch extension, you will need to multiply the hip line by 0.3.
Adding the Seam Allowance
You will need to add a seam allowance to your pattern pieces. You can either draw around your pattern piece to add a seam allowance, or you could just add it in when you’re cutting out. 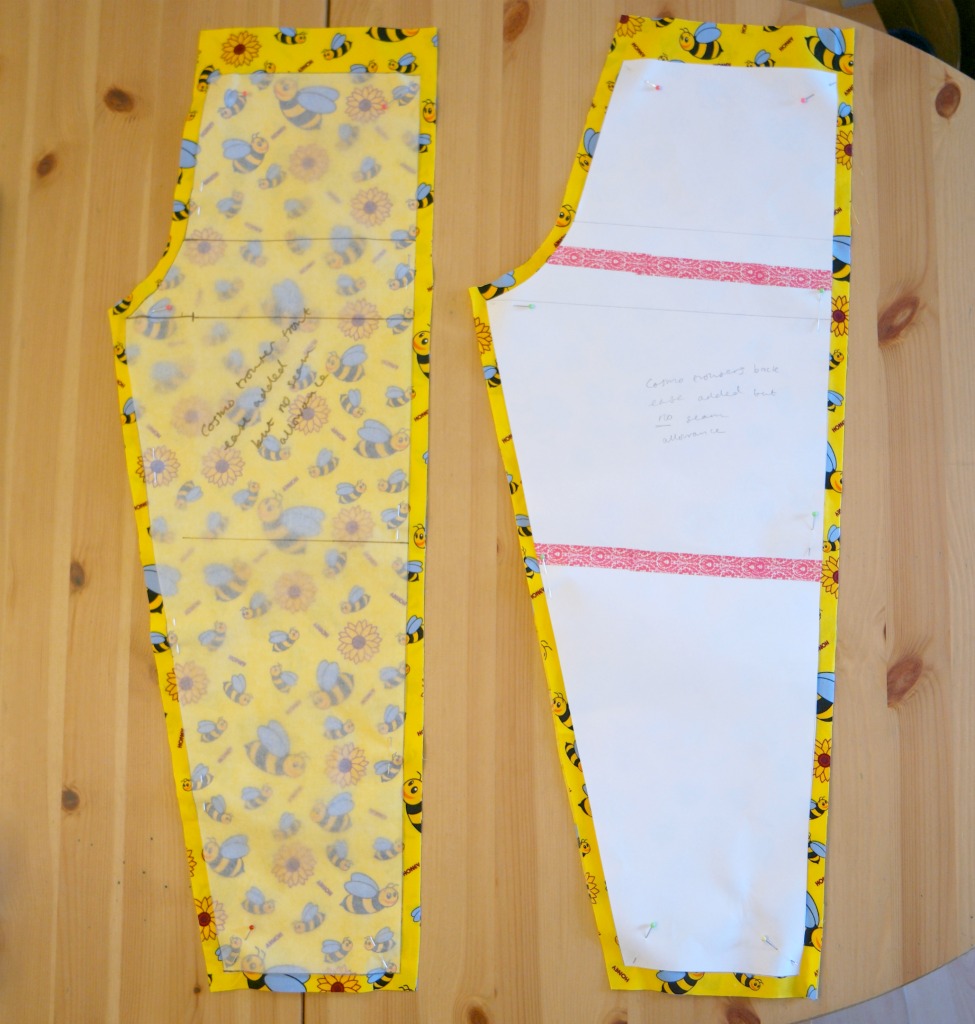
It’s a good idea to write on your pattern pieces whether you’ve added in the seam allowance or not to avoid causing yourself confusion if you decide to make yourself another pair at a later date.
Next week I’ll be showing you how to sew the pieces together to make the trousers!
Linking up here.


This is great! Do you have a trick to make sure that the front and back inseams end up the same length? If you just divide the ankle width in 2 and then draw a line from crotch to ankle, the back inseam ends up longer than the front inseam. I just played around with the width at the bottom until I got inseams of roughly the same length, but I figured there had to be an easier way?
In all honesty, I don’t know. I would probably do what you did and fiddle around with the bottom edge until they were the same.
Thanks so much Anna it was a awesome I do appreciate you 🙏 and always here to learn a things from you 🥰🥰❤️❤️
Hi anna
I’m attempting to make some oversized trousers
I have measurements from the size Guide of the trousers Im basing them off
However one of the measurements is “front crotch” it’s saying it’s 11inches I am assuming that is another way to say front rise.
If I’m correct in saying the front rise and the back rise will be slightly different especially in oversized trousers? Usually about 3 inches
Is it okay to slightly change the pattern so that the rise on the front of the pattern and the back of the pattern are two different numbers (11 inches for the front and 14 inches for the back) ? Or would that ruin the pattern?
With the trousers I made for my son, the horizontal rise line was longer for the back than for the front, so that would be right. It think it might be ok, but there’s only one way to find out! Maybe try with some old fabric or some cheap polycotton first x
Good day Anna,
Top of the day to you, hope life and health are all going well
Note:
Just found and rad your brilliant article on how to draft a trousers and believe it or not- i am a bespoke alterations tailor in London UK and have not made myself or anyone a pair of MTM pants for a long time, as I mainly do men’s & the odd ladies alterations.
I have been asked how much to make a pair of made to measure trousers and as i haven’t done so in a long time, and do not have any trimmings like i did back in the day, wasn’t to sure if its a chore i need to take on?
So I am now considering making myself a pair to see if i can remember the techniques, pipe pockets at rear have to be neat and corners have to be strong and square at the corners, and the side pockets and pocket bag have to be neat and clean.
I am not sure if the inside finish of the waistband should be selisia cotton or lining
Any ideas as i try and get my head around this deva vu MTM
Hi William, I would definitely make the trousers! I think the waistband on mens’ trousers is usually finished with cotton to make it a bit thicker. Good luck!
I tried following this. the result was a tight-fitting pants, so much so that when my kid tried on the 1st fitting (no garters yet, it didnt need garters. it’s pretty much tight on the hips. I figured the measurement should have included a lot of added inches and not the original .. figured it a lttle too late
A few days ago I asked on a FB group if someone could suggest pj patterns for me. I have a girl who is bigger & taller than her average peers & a boy who is much smaller than average. To even it out I have an average size 3rd child.
Someone suggested a pattern, saying I might have to extend the crotch. I had no idea what that meant. I’ve just read your post a number of times & was so glad for the comments as well because the questions I had have all been answered. Except for one, would you use the same method regardless the length? So for shorts too?
So pleased you found it useful, and yes, I would use the same method whatever the leg length.
Thank you Anna 🙂
I’ve been fighting with her favourite pair of shorts to draft a copy & I don’t feel like I’m winning. I can’t wait for the morning so I can start again.
Hers has a curve rising slightly from the hem into the side seams. Would I just draw that in with my French curve Im guessing?
Yes, French curve if you have one, or a plate if not x
Thank you:) I’ve done my front pattern but now I’m stuck in the back, in 2 places:
1. My hip measurement no longer makes a straight line with the waist as the back hip (divided in 2) is roughly 2″ bigger than the waist.
2. Calculating the rise on the back, am I starting with the same number I got on the back hip or the front hip? My gut says to start with the back measurement & multiply by 0.3.
So if I use these calculations, my back pattern slopes down to the right from waist to hip, then I have a curve down to the rise & quite a steep slope from the rise to the width I want my pants ( I’m making shorts).
Thank you for talking me through the process. I really do appreciate it.
Sorry I haven’t replied until now, I’ve had a busy couple of days!
Yes to back hip and multiply by 0.3. Checking your pattern with the rough shape of the original shorts might give you some reassurance. xx
This has really come in handy.Thanks Anna.
Happy you found it useful xx
I’m so glad I found this! My nephew is tall and slim, as well as muscular – I can’t wait to draft him some pyjama pants that will fit properly! Thank you ?
You’re welcome 🙂
Thank you Anna, you instructions are so easy to follow. I have three granddaughters so I will make them some funky pants like Cosmo.
Lovely, lucky granddaughters!
Glad i found this my grandson is quite small for 4, as he start school in september i need to make he some trousers i will try this and will let you know how i get on. Thanks
Hope you find it useful. Feel free to ask me anything!
Hi Anna. it’s me again, and O dear, it all looked so easy in your photos but mine doesn’t look the same! I have drawn the horizontal & vertical lines.
You say in step 2. “On that vertical line, mark on your waist (that’s at the top), distance from waist to hips, your rise, and waist to knee.
My waist to hip measurement is 28cm (11″) ( at the widest point)
My waist to Rise measurement is 23cm, (9”) so that makes it shorter than the hip and that doesn’t look right or make much sense. What am I doing wrong?
Hoping I can get this draft launched!!
Many thanks
Vicky
Hi Vicky, don’t panic! Firstly, check you measurements. Make sure that you are clear about where your waist is and you’re measuring from the same place each time. Your rise and where your hips are widest will probably be quite close together, on myself it’s a difference of about 5 cm. The widest point around your hips is probably where there’s a bony bump at the side where your leg bends. I hope that helps, leave another comment or email me if not 🙂
Thanks for the tutorial Anna and love having the photographs. I can never get pants, even PJ’s to fit me well so am looking forward to drafting my own.
Just one small thing re: the measurements. You say:
Around the front of your hips at the widest point
Around the back of your etc.
I’m taking that to mean across the hips at their widest point i.e. from L to R
I’m English so it may be me!
Thanks, BizzieBee
That is what I mean. I’ll change it so it’s clearer 🙂
I always make PJ bottoms for our 21 year old as he is 6’2″ with a 36″ inside leg and getting long PJ’s is a nightmare/impossible. However I’ve always just drawn around an old shop bought pair as a pattern and had the opposite problem to you, they’ve always been a little bit tight round the top, not enough give.

I will try this on the next pair, he will be pleased to have a pair that actually fit!
The thing he likes most though about his homemade PJ’s is that I put pockets in them – pockets are important apparently!
Julie recently posted…Upcycled Gift Box
Definitely pockets in your jimjams 🙂
A great tutorial. Very helpful!

Caroline J recently posted…Halcyon Times at Hatfield House
Hi Anna,
Thank you so very much for these instructions. I do have a question though………. Where you say to measure from your waist to where your butt meets the chair, do you mean from your waist down your back to the chair or at your side from your waist to your butt ??? Sorry, just a bit confused !!!!
kind regards,
Michelle
I measured down the side as it’s easier, especially on youself 🙂
Thank Ou very much for this
You’re welcome! xx