How to Make a DIY Body Form
A dress form is a very useful item to have if you make your own clothes. Draping, pinning and adjusting are all tricky to do on yourself, especially if you don’t have a kind friend who you can call on to help, or a husband who won’t mess it up!
However, the adjustable sort can be expensive and the non adjustable kind might not be the same size as you.
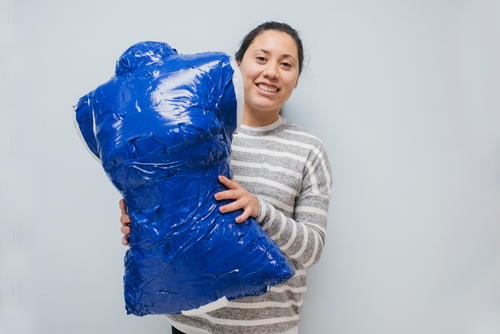
Thankfully there is an alternative! In this post, Maggie from All Free Sewing shows how to make a diy body form from duct tape.
Hello all you happy sewers!
My name is Maggie Connelly and I am the editor for AllFreeSewing.com. Anna is kindly letting me post here so that I can show you guys how to make a DIY Body Form. Now you don’t have to worry or fuss with trying on your sewing project numerous times. Making a body form that perfectly matches your body and proportions is a fantastic way to cut down some time in finishing up your sewing project.
Don’t bother wasting any more time trying on an altering that dress or skirt or blouse you’ve been working on. The great benefit of creating a body form that perfectly matches your body is that you know what the garment you are trying on is going to look like. You don’t have to follow a pattern just to see that once you make the alterations it doesn’t look like you had hoped. Skip the disappointment and wasted time and get started on creating basically your body double.

Materials
Pillow
Duct Tape
T-shirt (oversized)
Saran wrap
Loose Fiber Fill
Scissors
Instructions for How to Create Your Own Body Form
Note: If you are making this body form for yourself, you are going to need some help in creating it, as you will be the “model” in the instructions.
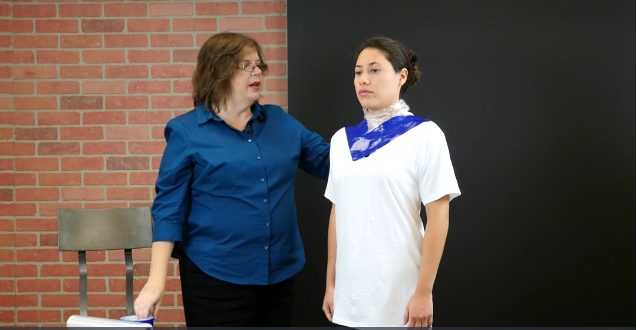
1. Wrap Saran wrap around the base of your model’s, or your own, neck. (This will prevent you from getting duct tape on the neck).
2. Using short lengths of tape, from the back, pull the t-shirt tight, and tape it into place.
Pro Tip: “You don’t really need to worry about wrinkles in your t-shirt. However, since the t-shirt is going to be large, you will want to tape it to fit the model simply because it can become very uncomfortable as you continue to tape” – Mary Beth Temple
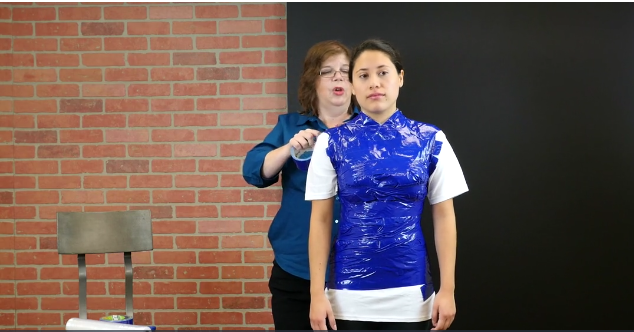
3. Tape up the entire t-shirt. Be careful to not make the shirt too tight. Start with a criss-cross pattern at the top of the neckline to cover the shoulders. You will want to be using a dark or colorful tape to contrast against your white t-shirt as well, so that you can make sure you are fully covering the entire shirt.
4. Make sure while you continue to wrap, that one strand of tape wraps around the next.
5. When you get under the arm, use wider strips and let them overlap to the front as you continue to tape.
6. Be sure to only go 3-5 inches below the hipline, but not any further.
7. Going back to the front on the shirt, after you have your criss-cross completed, go side-to-side with the rest of the front side of the shirt.
8. Place some strips around the collar and each shoulder to know where to cut to keep a clean line.
9. To keep the bottom of the body form smooth, start at the bottom and spin around and around as high as you can go.
10. Turn your model around and prepare to cut all the way up the back. Be sure to only cut the t-shirt and not any other clothing the model may be wearing.
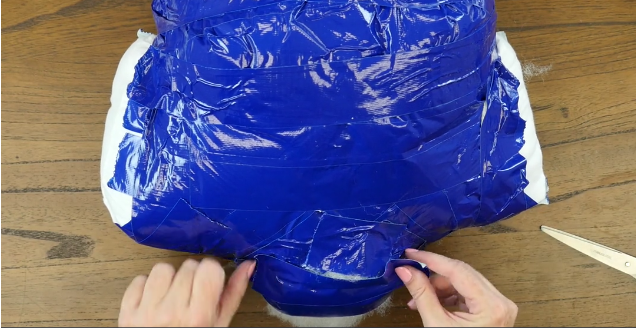
11. Stuff your dress form as tightly as possible using loose fiber fill, starting with the bust area.
12. Use a polyester pillow to take up most of the space for your body form.
13. Tuck your sleeves inside of the form to keep the stuffing from leaking out.
14. Work from the waist out and tape.
15. Make sure you have enough stuffing in the shoulders to keep them from collapsing.
16. Tape across the neckline to keep the stuffing from leaking out. Be sure to not apply too much pressure but simply lay the tape across the top so that you do not create a flat or caved in neck and shoulders area.
17. Tuck your pillow up as far as it will go and tuck the ends of your shirt over the pillow. Then tape it all in place to keep the pillow from falling out.
Now that you have your own personal body form ready to go, why not test it out with some new sewing patterns? Check out this amazing collection of 35 FREE Printable Sewing Patterns just for you!


Awesome guide! I’ve been looking around for a body form I could afford but haven’t had much luck so I’m going to DIY one. Thanks for this guide!
Have fun making it!
I’d love a body form but never thought to make my own. You need a good friend on hand for this I think but what a great idea!

Julie recently posted…Handmade Monday #17
It’s probably the best way of getting one that’s the right size 🙂
It really is one of those things that I intend to do but never get round to, which is daft as it is such a time saver in the long run!!
I think it would be a fun thing to do as well 🙂
This is such a fun way to make a bodyform!

Caroline J recently posted…Improvisation Quilt
Fantastic timing Anna. I was going to “Google” how to make a body form? When I had finished reading your email, saved me the time and the super pictorial means that my helper can get the taping right. Given I can only stand for a few minutes at a time this is vital.
I’m going to put a cardboard base on the bottom of my model and an old broom handle through the middle, this will be secured on a wooden base. I can then sit in my wheelchair and access my “body”
I’m glad you’ve found it useful and I hope the making of your body form goes well!
I filled my “body” with expanding foam which made it more firm but light. Also use a craft knife to cut the strips on the shiny side of the duct tape as scissors get gunged up so quickly. That was very frustrating.
Expanding foam’s a good idea 🙂 I know what you mean about scissors, sometimes sticky stuff can be difficult to remove too xx
Thanks for this post – what a genius way to create a Body Form. I’ll certainly be giving this a try in the future x
Thanks Rebecca 🙂